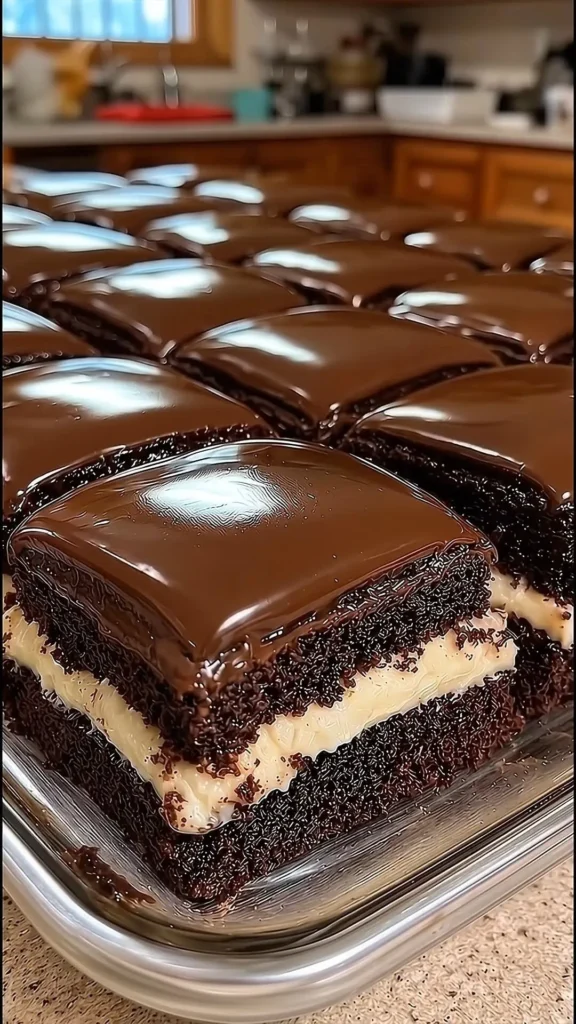
There is something irresistible about a rich chocolate cake layered with smooth vanilla cream and covered in glossy chocolate ganache. This Moist Chocolate Cake with Vanilla Cream Filling combines three delicious textures: soft chocolate sponge, a thick and creamy vanilla center, and a luxurious chocolate topping.
Each square features two layers of tender, cocoa-rich cake surrounding a generous layer of silky vanilla cream. The entire dessert is finished with a smooth chocolate ganache that gently flows over the edges, creating a beautiful bakery-style appearance.
This homemade dessert is perfect for birthdays, family gatherings, celebrations, weekend baking, or whenever you want something special with your coffee.
Despite its impressive appearance, the recipe uses simple ingredients and easy preparation techniques. With a little patience during cooling and assembly, you can create a dessert that looks and tastes like something from a professional pastry shop.
Why You’ll Love This Recipe
Incredibly moist texture: The chocolate sponge stays soft and tender thanks to the combination of milk, oil, and hot coffee.
Creamy vanilla filling: A rich, smooth vanilla custard creates a delicious contrast with the chocolate layers.
Glossy chocolate topping: Homemade ganache gives the cake a beautiful finish and deep chocolate flavor.
Perfect for gatherings: The cake can be cut into individual squares, making it easy to serve.
Make-ahead friendly: Preparing the dessert in advance allows the layers to set beautifully.
Simple ingredients: Everything can be made with everyday baking essentials.
Ingredients
For the Moist Chocolate Cake
-
2 cups (250 g) all-purpose flour
-
1¾ cups (350 g) granulated sugar
-
¾ cup (75 g) unsweetened cocoa powder
-
2 teaspoons baking powder
-
1½ teaspoons baking soda
-
½ teaspoon salt
-
2 large eggs
-
1 cup (240 ml) whole milk
-
½ cup (120 ml) vegetable oil
-
2 teaspoons vanilla extract
-
1 cup (240 ml) hot coffee or hot water
For the Vanilla Cream Filling
-
2½ cups (600 ml) whole milk
-
½ cup (100 g) granulated sugar
-
4 large egg yolks
-
¼ cup (30 g) cornstarch
-
2 tablespoons all-purpose flour
-
2 teaspoons vanilla extract
-
3 tablespoons (45 g) unsalted butter
-
¾ cup (180 ml) cold heavy whipping cream
-
2 tablespoons powdered sugar
For the Chocolate Ganache
-
10 oz (280 g) semi-sweet chocolate, finely chopped
-
1 cup (240 ml) heavy cream
-
1 tablespoon unsalted butter
-
1 teaspoon honey or corn syrup (optional, for extra shine)
Choosing the Best Chocolate
Chocolate is the star ingredient in this dessert, so choosing good-quality chocolate makes a noticeable difference.
For the sponge, use unsweetened cocoa powder with a rich chocolate aroma.
Natural cocoa powder works particularly well with the baking soda in this recipe.
For the ganache, semi-sweet chocolate provides a balanced flavor that is rich without being excessively bitter.
If you prefer a more intense chocolate taste, replace part of the semi-sweet chocolate with dark chocolate containing approximately 60–70% cocoa.
Milk chocolate can also be used, but it produces a sweeter and softer ganache and may require a different cream ratio.
For the smoothest result, use chopped baking chocolate rather than chocolate chips, which may contain stabilizers that affect melting.
The Secret to an Ultra-Moist Chocolate Sponge
The key to a moist chocolate cake is balancing the wet and dry ingredients.
Vegetable oil helps keep the crumb tender even after refrigeration.
Milk adds richness, while eggs provide structure.
Hot coffee enhances the chocolate flavor without making the cake taste strongly of coffee.
If you prefer a caffeine-free dessert, replace the coffee with hot water.
The batter will appear relatively thin, which is completely normal.
Avoid adding extra flour, as this may produce a dense cake.
Making a Stable Vanilla Cream Filling
A good vanilla filling should be thick enough to hold its shape between the chocolate layers while remaining smooth and creamy.
Cornstarch and egg yolks help thicken the custard.
Butter adds richness and improves the texture.
Once the custard has cooled completely, gently folding in whipped cream creates a lighter, more delicate filling.
It is important to chill the cream before assembling the cake.
Warm filling can soften the chocolate sponge and cause the layers to slide.
Recommended Equipment
For the best results, prepare a 9 × 13-inch baking pan, two mixing bowls, an electric mixer, a whisk, a medium saucepan, a spatula, a serrated knife, a cooling rack, and an offset spatula.
A kitchen scale is also useful for accurate measurements.
Part 2: Step-by-Step Preparation
Step 1: Prepare the Baking Pan
Preheat your oven to 350°F (175°C).
Grease a 9 × 13-inch rectangular baking pan with butter or nonstick baking spray.
Line the bottom with parchment paper, leaving some overhang on the sides.
This makes removing the cake easier after baking.
Set the prepared pan aside.
Step 2: Mix the Dry Ingredients
In a large mixing bowl, combine the flour, granulated sugar, cocoa powder, baking powder, baking soda, and salt.
Whisk thoroughly until the ingredients are evenly distributed.
If the cocoa powder contains lumps, sift it before adding it to the bowl.
This helps create a smoother batter and a more uniform cake texture.
Step 3: Add the Wet Ingredients
Add the eggs, milk, vegetable oil, and vanilla extract to the dry mixture.
Using an electric mixer on medium speed, beat for approximately two minutes.
Scrape down the sides of the bowl with a spatula.
Continue mixing until the batter is smooth and no dry flour remains.
Avoid excessive mixing, which can affect the cake’s tenderness.
Step 4: Add the Hot Coffee
Slowly pour the hot coffee or hot water into the batter.
Mix on low speed until fully incorporated.
The batter will become noticeably thinner.
This is expected and helps produce a soft, moist sponge.
Make sure the liquid is evenly distributed throughout the mixture.
Step 5: Bake the Chocolate Cake
Pour the batter into the prepared baking pan.
Spread it evenly using a spatula.
Place the pan in the center of the preheated oven.
Bake for approximately 30–35 minutes.
Check the cake by inserting a toothpick into the center.
If it comes out clean or with a few moist crumbs, the cake is ready.
Avoid overbaking because this can dry out the sponge.
Step 6: Cool the Cake Completely
Remove the cake from the oven.
Allow it to cool in the pan for approximately 15 minutes.
Carefully transfer it to a cooling rack.
Let the cake cool completely before slicing or assembling.
For easier handling, wrap the cooled cake and refrigerate it for approximately 30 minutes.
A slightly chilled cake is easier to cut into even layers.
Step 7: Prepare the Vanilla Custard
Pour the milk into a medium saucepan and heat over medium-low heat until steaming.
In a separate bowl, whisk together the egg yolks, sugar, cornstarch, and flour.
Continue whisking until smooth.
Gradually pour a small amount of warm milk into the egg mixture while whisking continuously.
This process, called tempering, prevents the eggs from scrambling.
Slowly add the remaining warm milk.
Return the mixture to the saucepan.
Step 8: Thicken the Vanilla Cream
Cook the custard over medium-low heat, stirring constantly.
After several minutes, the mixture will begin to thicken.
Continue cooking until it reaches a thick, pudding-like consistency and bubbles gently.
Allow it to cook for another minute while stirring.
Remove the saucepan from the heat.
Add the butter and vanilla extract.
Stir until the butter has completely melted.
Transfer the custard to a clean bowl.
Cover the surface directly with plastic wrap to prevent a skin from forming.
Refrigerate until completely cold.
Step 9: Make the Filling Light and Creamy
Pour the cold heavy cream into a mixing bowl.
Add the powdered sugar.
Whip until medium-stiff peaks form.
In another bowl, briefly whisk the chilled vanilla custard until smooth.
Gently fold the whipped cream into the custard in two or three additions.
Use a spatula and slow folding movements to preserve the airy texture.
Refrigerate the finished filling until needed.
Step 10: Slice the Chocolate Cake
Place the cooled cake on a clean cutting board.
Using a long serrated knife, carefully slice the cake horizontally into two even layers.
Work slowly to avoid breaking the sponge.
If the top of the cake has formed a dome, trim it slightly before slicing.
Place the bottom layer onto a serving tray or back into a parchment-lined pan.
Step 11: Add the Vanilla Cream Filling
Spread the prepared vanilla cream evenly over the bottom chocolate layer.
Use an offset spatula to create a smooth surface.
The filling should form a generous, visible layer.
Carefully position the second chocolate sponge layer on top.
Press very gently to help the layers settle.
Avoid pressing too firmly, as the cream may squeeze out around the edges.
Refrigerate the assembled cake for at least one hour.
This helps stabilize the filling before adding the chocolate topping.
Step 12: Prepare the Chocolate Ganache
Place the finely chopped chocolate in a heatproof bowl.
Pour the heavy cream into a small saucepan.
Heat until it begins to steam and small bubbles appear around the edges.
Do not allow the cream to boil vigorously.
Pour the hot cream over the chocolate.
Let the mixture sit undisturbed for approximately two minutes.
Slowly stir from the center outward until the chocolate melts completely.
Add the butter and optional honey.
Continue stirring until the ganache becomes smooth, glossy, and silky.
Allow it to cool slightly until thickened but still pourable.
Step 13: Cover the Cake with Ganache
Remove the chilled cake from the refrigerator.
Pour the chocolate ganache over the top.
Use an offset spatula to spread it evenly.
Allow a little ganache to flow gently toward the edges.
For a thick, bakery-style finish, ensure the entire top surface is generously coated.
Refrigerate the cake for approximately two hours, or until the ganache and filling are firm enough to slice neatly.
Step 14: Cut into Perfect Squares
Fill a tall container with hot water.
Dip a sharp knife into the water, then wipe it dry.
Carefully cut the cake into evenly sized squares.
Clean and warm the knife between cuts.
This technique helps create neat edges and prevents the cream from smearing into the chocolate layers.
Arrange the squares on a serving platter.
For the glossy appearance shown in the photograph, allow the ganache to soften slightly at room temperature before serving.
Expert Tips for Bakery-Style Results
Cool the cake completely: Warm sponge can melt the vanilla filling.
Use room-temperature eggs: They blend more easily into the batter.
Avoid overbaking: A slightly moist crumb produces the best texture.
Chill between stages: Refrigeration helps keep the layers stable.
Use quality chocolate: Better chocolate creates smoother, richer ganache.
Cut with a warm knife: This produces clean, professional-looking squares.
Serve slightly chilled: The cream holds its shape while the chocolate remains pleasantly soft.
Delicious Recipe Variations
Chocolate and Strawberry Cream Cake
Add a thin layer of chopped fresh strawberries over the vanilla cream.
The fruit adds freshness and a pleasant contrast to the rich chocolate.
Chocolate Coffee Cream Cake
Add one teaspoon of instant espresso powder to the vanilla custard.
This creates a subtle coffee flavor that complements the chocolate sponge.
Chocolate Hazelnut Cake
Spread a thin layer of chocolate hazelnut cream over the bottom sponge before adding the vanilla filling.
Sprinkle chopped toasted hazelnuts over the ganache.
Double Chocolate Cream Cake
Replace the vanilla filling with chocolate pastry cream.
Add two tablespoons of cocoa powder or melted dark chocolate to the custard for a more intense chocolate dessert.
Storage and Make-Ahead Instructions
Because the cake contains a dairy-based cream filling, it must be refrigerated.
Store the cake in an airtight container in the refrigerator for up to three to four days.
For the best texture, remove individual portions from the refrigerator approximately 10–15 minutes before serving.
Do not leave the cake at room temperature for more than two hours.
You can bake the chocolate sponge one day in advance.
Wrap it tightly and refrigerate until ready to assemble.
The vanilla custard can also be prepared ahead of time and refrigerated.
For freezing, it is best to freeze the unfrosted chocolate sponge rather than the fully assembled dessert, as the cream filling may change texture after thawing.
Frequently Asked Questions
Can I make this cake without coffee?
Yes. Replace the hot coffee with the same quantity of hot water.
The cake will still be moist and chocolatey.
Can I use store-bought pudding for the filling?
Yes, but choose a thick vanilla pudding and chill it thoroughly.
Homemade custard generally provides a richer flavor and better texture.
Why is my ganache too thin?
The ganache may still be warm or may contain too much cream.
Allow it to cool before spreading.
How do I keep the filling from squeezing out?
Use a thick, well-chilled filling and avoid pressing the top cake layer too firmly.
Chill the assembled cake before glazing.
Can I make this dessert the day before serving?
Absolutely. In fact, preparing it the day before often improves the texture because the layers have time to settle and firm up.
Final Thoughts
Moist Chocolate Cake with Vanilla Cream Filling and Silky Chocolate Ganache is the perfect dessert for anyone who loves rich chocolate and smooth, creamy textures.
The soft chocolate sponge, generous vanilla filling, and glossy ganache create a beautiful combination that looks impressive and tastes even better.
Whether you’re baking for a celebration, a family gathering, or simply treating yourself, these indulgent chocolate cake squares are sure to become a favorite.
Serve them with a cup of coffee, a glass of cold milk, or a scoop of vanilla ice cream for an unforgettable homemade dessert.