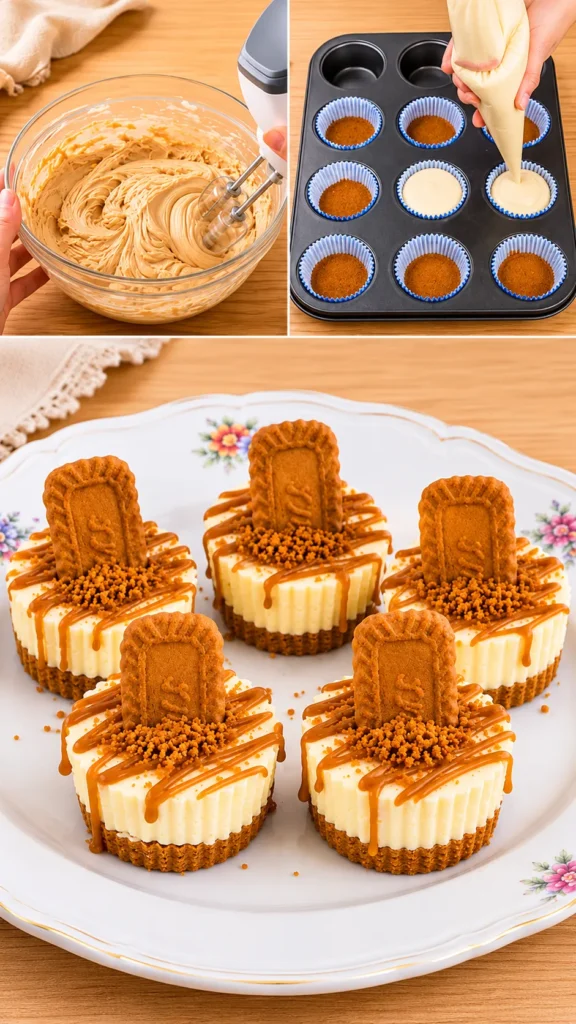
If you love creamy cheesecake, crunchy cookies, and the irresistible caramelized flavor of Lotus Biscoff, these No-Bake Lotus Biscoff Mini Cheesecakes are the perfect dessert for you. Each little cheesecake features a buttery Biscoff cookie crust, a smooth and fluffy cream cheese filling, and a delicious topping of melted cookie butter, crushed biscuits, and a whole Biscoff cookie.
These individual cheesecakes are not only beautiful but also incredibly easy to prepare. Since they require no baking, they are an excellent choice for beginners, busy home cooks, or anyone who wants to create an impressive dessert without spending hours in the kitchen.
The combination of textures makes these mini cheesecakes especially satisfying. The cookie base provides a delicate crunch, the creamy filling melts in your mouth, and the cookie butter topping adds a rich caramelized sweetness.
Whether you’re preparing a family gathering, birthday celebration, holiday dessert table, or simply treating yourself, these little cheesecakes are guaranteed to become a favorite.
Why You’ll Love This Recipe
One of the best things about these mini cheesecakes is their simplicity. You don’t need a water bath, an oven, or complicated baking techniques.
The recipe uses everyday ingredients that are easy to find in most supermarkets.
Another advantage is that these desserts can be prepared ahead of time. In fact, allowing them to chill overnight improves their texture and makes them easier to remove from the molds.
Their individual portions also make serving convenient. Everyone gets a beautifully decorated cheesecake without needing to slice a large cake.
The flavor is wonderfully balanced. Cream cheese adds a gentle tanginess that complements the sweet, spiced notes of Lotus Biscoff cookies.
Ingredients
For the Biscoff Cookie Crust
-
200 g Lotus Biscoff cookies
-
75 g unsalted butter, melted
For the Creamy Cheesecake Filling
-
450 g full-fat cream cheese, softened
-
100 g powdered sugar
-
200 ml cold heavy whipping cream
-
120 g smooth Lotus Biscoff spread
-
1 teaspoon vanilla extract
-
1 tablespoon fresh lemon juice (optional)
For the Decoration
-
100 g Lotus Biscoff spread, melted
-
6 Lotus Biscoff cookies, finely crushed
-
12 whole Lotus Biscoff cookies
Choosing the Best Ingredients
Lotus Biscoff Cookies
These caramelized biscuits are the signature ingredient in this recipe. Their distinctive flavor comes from a combination of caramelized sugar and warm spices.
When crushed and combined with melted butter, they create a deliciously firm cheesecake base.
For the best texture, crush the biscuits into fine, even crumbs.
Cream Cheese
Full-fat cream cheese is essential for achieving a rich and stable cheesecake filling.
Low-fat varieties contain more moisture and may produce a softer result.
Allow the cream cheese to soften slightly before mixing to prevent lumps.
Heavy Whipping Cream
Cold whipping cream gives the filling its light and airy texture.
Choose cream with at least 35% fat whenever possible. It should be whipped separately before being folded into the cheesecake mixture.
Lotus Biscoff Spread
Smooth cookie butter adds the unmistakable caramelized biscuit flavor.
It blends beautifully with cream cheese and creates a filling that is both creamy and indulgent.
Powdered Sugar
Powdered sugar dissolves easily into the cream cheese, ensuring a smooth filling without any grainy texture.
Equipment You’ll Need
A standard 12-cup muffin pan works perfectly for making individual cheesecakes.
You will also need paper cupcake liners, two mixing bowls, an electric hand mixer, a spatula, and a spoon or piping bag.
A food processor is helpful for crushing the cookies, although a rolling pin and a resealable plastic bag work just as well.
For easier removal, silicone muffin molds can be used instead of paper liners.
Part 2: Step-by-Step Preparation
Step 1: Prepare the Muffin Pan
Start by lining a standard 12-cup muffin pan with paper cupcake liners.
Make sure each liner sits neatly inside its cavity.
If you’re using silicone molds, place them on a sturdy tray so they can be transferred easily to the refrigerator.
Preparing the molds before mixing the ingredients will make assembly quicker and more convenient.
Step 2: Crush the Biscoff Cookies
Place 200 g of Lotus Biscoff cookies into a food processor.
Pulse until the cookies become fine crumbs.
If you don’t have a food processor, place the cookies inside a resealable plastic bag and crush them with a rolling pin.
Try to avoid leaving large pieces, as a fine crumb texture helps the crust hold together.
Transfer the crushed cookies to a mixing bowl.
Step 3: Make the Cookie Crust
Melt the unsalted butter in a small saucepan or microwave-safe bowl.
Pour the melted butter over the cookie crumbs.
Mix thoroughly until the crumbs resemble damp sand.
The mixture should hold together when pressed between your fingers.
Divide the cookie mixture evenly among the 12 prepared muffin cups.
Use the back of a spoon or the bottom of a small glass to press the crumbs firmly into each liner.
Place the muffin pan in the refrigerator for approximately 20 minutes while preparing the filling.
This helps the crust become firm.
Step 4: Beat the Cream Cheese
Place the softened cream cheese in a large mixing bowl.
Using an electric mixer, beat for approximately two minutes until smooth and creamy.
Add the powdered sugar and vanilla extract.
Continue mixing until the ingredients are fully incorporated.
Scrape down the sides of the bowl with a spatula to ensure there are no lumps.
If using lemon juice, add it at this stage.
The lemon juice provides a subtle tang that balances the sweetness of the cookie butter.
Step 5: Add the Biscoff Spread
Add 120 g of smooth Lotus Biscoff spread to the cream cheese mixture.
Beat on medium speed until completely combined.
The mixture should become smooth, thick, and lightly caramel-colored.
Avoid overmixing once everything is incorporated.
Taste the mixture and adjust the sweetness if necessary.
Step 6: Whip the Heavy Cream
Pour the cold heavy whipping cream into a separate chilled mixing bowl.
Using an electric mixer, whip until stiff peaks form.
This means the cream should hold its shape when the beaters are lifted.
Be careful not to overwhip, as the cream can become grainy.
The whipped cream is responsible for giving the cheesecake filling its light, mousse-like texture.
Step 7: Combine the Filling
Add approximately one-third of the whipped cream to the cream cheese mixture.
Fold gently with a spatula until incorporated.
Add the remaining whipped cream in two portions.
Continue folding carefully, using slow movements to preserve as much air as possible.
The finished filling should be thick, fluffy, and smooth.
Avoid using the electric mixer at this stage, as it can deflate the whipped cream.
Step 8: Fill the Muffin Cups
Remove the muffin pan from the refrigerator.
Transfer the cheesecake filling into a piping bag fitted with a large round tip.
Pipe the mixture evenly over each chilled cookie crust.
If you don’t have a piping bag, use a spoon.
Fill each liner almost to the top, leaving a little space for the decoration.
Smooth the surfaces with the back of a spoon or a small spatula.
Step 9: Chill the Mini Cheesecakes
Cover the muffin pan loosely with plastic wrap or place it inside a large covered container.
Refrigerate for at least six hours.
For the firmest texture, leave the cheesecakes in the refrigerator overnight.
During this time, the filling will become more stable and the cookie crust will firm up.
Avoid removing the cheesecakes from their molds too early, as they may lose their shape.
Step 10: Prepare the Biscoff Topping
Place 100 g of Lotus Biscoff spread into a microwave-safe bowl.
Heat in short intervals of approximately 10 seconds, stirring between each interval.
Continue until the spread becomes smooth and pourable.
Allow it to cool slightly before decorating.
The topping should be fluid but not hot enough to soften the cheesecake filling.
Step 11: Decorate the Cheesecakes
Carefully remove the chilled mini cheesecakes from the muffin pan.
Peel away the paper liners slowly.
Place the cheesecakes on a serving plate.
Drizzle the melted Biscoff spread over each cheesecake using a spoon or piping bag.
Sprinkle crushed Biscoff cookies over the center.
Finally, insert one whole Biscoff cookie vertically into the top of each cheesecake.
For the best appearance and crunch, add the whole cookies shortly before serving.
Step 12: Serve and Enjoy
Arrange the finished cheesecakes on a decorative platter.
Serve them chilled for the best texture.
Each bite offers a combination of crunchy cookie crust, creamy cheesecake filling, and rich caramelized Biscoff flavor.
These desserts pair wonderfully with coffee, tea, or a glass of cold milk.
Expert Tips for Perfect Mini Cheesecakes
Use room-temperature cream cheese. Cold cream cheese can create lumps that are difficult to remove.
Keep the whipping cream cold. Cold cream whips more easily and produces a more stable texture.
Press the crust firmly. A compact cookie base prevents crumbling when the cheesecakes are removed from their molds.
Don’t rush the chilling process. The filling needs sufficient time to become firm.
Use a piping bag for neat portions. This makes the mini cheesecakes look more professional.
Decorate just before serving. Whole Biscoff cookies can soften when exposed to moisture from the cheesecake.
Delicious Variations
Chocolate Biscoff Mini Cheesecakes
Add 100 g of melted and cooled dark chocolate to the cream cheese mixture before folding in the whipped cream.
This creates a richer cheesecake with a delicious combination of chocolate and caramelized cookies.
White Chocolate Biscoff Cheesecakes
Mix 100 g of melted white chocolate into the filling for a sweeter and creamier variation.
Reduce the powdered sugar slightly to prevent the dessert from becoming overly sweet.
Biscoff Cheesecakes with Caramel
Drizzle a little caramel sauce over the finished cheesecakes along with the melted cookie butter.
A small pinch of flaky sea salt can help balance the sweetness.
Mini Biscoff Cheesecake Cups
Instead of using a muffin pan, assemble the crust and filling in small dessert glasses.
This version requires no unmolding and is especially convenient for parties.
Storage and Make-Ahead Instructions
These mini cheesecakes are excellent make-ahead desserts.
Store them in an airtight container in the refrigerator for up to four days.
For the freshest appearance, add the cookie decorations immediately before serving.
The cheesecakes can also be frozen without their toppings.
Place them in a freezer-safe container, separating layers with parchment paper.
Freeze for up to two months.
When ready to serve, transfer them to the refrigerator and allow them to thaw overnight.
Avoid thawing at room temperature for extended periods, as this can affect their texture.
Frequently Asked Questions
Can I make these mini cheesecakes without baking?
Absolutely. This recipe requires no oven. The filling becomes firm through refrigeration.
Why is my cheesecake filling too soft?
The most common causes are insufficient whipping of the cream, low-fat cream cheese, or inadequate chilling time.
Can I use crunchy Biscoff spread?
Yes. Crunchy cookie butter can be used, although the filling will have small biscuit pieces instead of a completely smooth texture.
Can I prepare these cheesecakes the day before?
Yes. Preparing them the day before is recommended because overnight chilling helps the filling become more stable.
How do I remove the cheesecakes neatly?
Make sure they are fully chilled before removing the liners. Silicone molds generally provide the easiest release.
Can I make one large cheesecake instead?
Yes. The ingredients can be used in a small springform pan, approximately 18–20 cm in diameter. The cheesecake should be refrigerated overnight before slicing.
Final Thoughts
These No-Bake Lotus Biscoff Mini Cheesecakes combine everything that makes a dessert irresistible: a buttery cookie crust, a smooth cream cheese filling, and the rich caramelized flavor of Lotus Biscoff.
They’re simple enough for everyday preparation yet elegant enough for birthdays, holidays, and special celebrations.
With their beautiful individual presentation and wonderfully creamy texture, these mini cheesecakes are sure to impress family and friends.
Best of all, you can prepare them in advance, leaving more time to enjoy the occasion.
If you’re looking for an easy, delicious, and visually impressive dessert, these creamy Biscoff mini cheesecakes deserve a place in your recipe collection.