Step-by-Step Instructions
1. Prepare the Baking Pan
- Line an 8×8-inch baking pan with parchment paper, making sure to leave enough overhang to easily lift the caramel out once it sets. Grease the parchment paper lightly with butter to prevent the caramel from sticking.
2. Melt the Butter
- In a heavy-bottomed saucepan, melt the butter over medium heat. Be sure to use a large enough pan, as the caramel mixture will bubble up during cooking.
3. Add the Sugar and Syrup
- Once the butter has melted, add the brown sugar, corn syrup, and sweetened condensed milk to the saucepan. Stir the mixture continuously with a wooden spoon or heatproof spatula to ensure the ingredients are well combined.
4. Cook the Caramel
- Attach a candy thermometer to the side of the pan, making sure it’s not touching the bottom of the saucepan. Bring the mixture to a boil over medium heat, stirring frequently.
- Continue to cook the caramel until the mixture reaches 240°F (115°C), known as the soft-ball stage. This ensures that the caramel will be soft and chewy when cooled. Be patient—it can take around 15-20 minutes to reach this temperature, but it’s worth it!
5. Add Vanilla and Salt
- Once the caramel reaches the soft-ball stage, immediately remove the pan from the heat. Stir in the vanilla extractand salt for added flavor. The vanilla gives the caramel a deeper, richer taste, while the salt balances out the sweetness.
6. Pour the Caramel
- Carefully pour the hot caramel mixture into the prepared baking pan. Use a spatula to spread the caramel evenly into the corners of the pan. If you’re feeling fancy, sprinkle some sea salt on top of the caramel for a sweet and salty twist.
7. Let the Caramel Set
- Allow the caramel to cool completely at room temperature for about 4 hours, or until it’s firm enough to cut into squares. You can also speed up the process by refrigerating the pan for about 1 hour, but make sure not to freeze it.
8. Cut and Wrap the Caramels
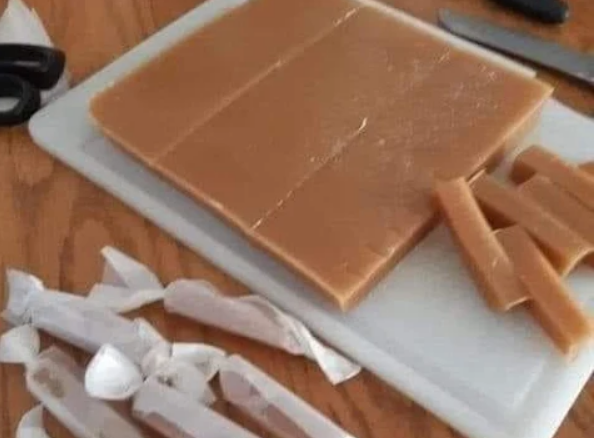
Once the caramel has set, use the parchment paper to lift it out of the baking pan. Transfer the block of caramel to a cutting board. Using a sharp knife, slice the caramel into squares or rectangles—whatever size you prefer.
For that classic homemade look, cut wax paper into squares and wrap each piece of caramel individually. Twist the ends of the wax paper to seal the candies.
Tips for Perfect Homemade Caramel
Monitor the Temperature: A candy thermometer is your best friend when making caramel. Cooking the caramel to the soft-ball stage ensures the perfect chewy texture. Be careful not to overcook it, as this can lead to hard or brittle caramel.
Stir Constantly: Caramel can burn quickly, so make sure to stir constantly while cooking. This ensures even cooking and prevents the mixture from sticking to the bottom of the pan.
Add Flavors: You can infuse your caramels with additional flavors by adding extracts like maple or almond, or by stirring in chopped nuts for a crunchy texture.
Directions
Variations to Try
Chocolate-Dipped Caramels: For an extra indulgent treat, dip your caramel squares in melted dark chocolate. Allow the chocolate to set for a rich, chocolatey coating.
Salted Caramel: Sprinkle flaky sea salt on top of the caramels before they fully set for that classic salted caramel flavor.
Caramel Turtles: Place pecans on top of the caramel squares before they set, and drizzle with chocolate to create homemade turtle candies.
Storage Tips
Homemade caramels will stay fresh for up to 2 weeks when stored in an airtight container at room temperature. You can also refrigerate or freeze them to extend their shelf life. Just make sure to bring them to room temperature before enjoying to get that soft, chewy texture back.
Serving Suggestions
Gift-Worthy: Wrap each caramel in wax paper and package them in a cute tin or box for a delightful homemade gift.
Sweet Treat: Enjoy your caramel candies as a mid-day snack or after-dinner dessert.
Use in Baking: These caramels are perfect to melt down and use as a filling for cookies, bars, or cakes.
